Lighting a Wreck

Dave Montizambert explains how he metered and lit a wrecked car for a public service campaign ad.
Photographer and author Dave Montizambert lectures internationally on lighting and digital photography. His studio, Montizambert Photography Inc., has been creating imagery for international and national clients for over 25 years. To learn more about his photography and books, visit his Web site. You can also find his video courses on Software Cinema.
As a photographer, I am usually called upon to make things look beautiful, usually more beautiful than they really are. When I received a layout from an advertising agency to create a beauty shot of a car wreck for a billboard campaign aimed at young drivers to promote Road Sense, I had to change gears. The concept for this counter-attack against the glorification of high-speed/high-performance auto advertising was fired over to me in the form of a hasty sketch, a car wreck against a white backdrop that would be close-cut in Photoshop.
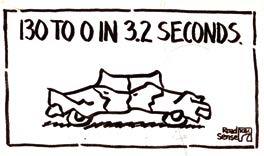
The hasty sketch.
We received the layout at around noon, and at 2:00 p.m. we were at an auto-wrecking yard with the art director, picking out a suitable car from which the occupants had survived. By 4:00 p.m. we were back at the studio beginning the setup and painting of the cove wall. The next day at 8:00 a.m. a flatbed truck delivered our wreck, which was dragged off the truck with a winch and then loaded onto dollies to be rolled into studio. At 9:00 a.m. the art director arrived at the studio and announced that the angle on the car had changed from side to 3/4-rear angle. Why I have never had an ulcer is beyond me!
And now the fun part: It was decided that the car was not battered enough, so out came my collection of sledgehammers, which were used for several joyous minutes of bashing the car further out of shape—maybe that’s why I didn’t get an ulcer!
To light and photograph the car, we (a small crew consisting of one photographer and two assistants) begin by pushing the car into place on the newly-painted cove; any tracks or marks on the cove floor are painted over once the car position is finalized. The two assistants did a quick cleanup/detailing of the car to make it nice and shiny while viewing angle was discussed with the art director. Once angle was determined a view camera was dropped into place and after 30 minutes of tweaking its various knobs for perspective, plane of sharpness, and aperture (for depth of field), we were ready to move onto lighting.
To light the wreck, we had to first determine what size light source would be required and where it should be placed. The easiest way to figure this out was to look through the camera from the camera position, and then direct an assistant with a flashlight to move around the car.
In about 20 minutes we were able to map out the size and position by viewing where the flashlight’s beam fell on the car and then marking the flashlight’s current position in space with light stands. We then measured the virtual rectangle created by four light stands, which marked the height and position of the four corners of the light source. To light the wreck, a 9x20-foot Chimera Ultimate Support frame was suspended from the ceiling by nylon lines. A 10x21-foot piece of bleached-white muslin fabric was stretched over the frame and secured with utility clamps. A 650-watt tungsten light was placed on a stand to the right of the car and high enough so that its beam of light washed over the top center of the panel. More flashlight work revealed the need for a smaller second panel (6x10 feet) with more white muslin stretched over it and with a second 650-watt tungsten light shining through it. This source was placed at the back of the car, to the left of the camera, to bring out the wreck’s crumpled rear-end. A third, 650-watt tungsten light was aimed at the white cove wall to the right of the car front, this soft-edged puddle of light created soft-edged specular highlights down the passenger side of the wreck. Light from these three sources lit the white floor around the wreck, thus creating appropriate specular highlights on the lower fenders.
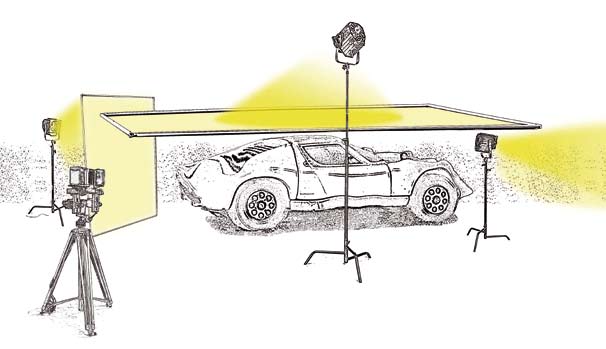
Since the car was to be cut out from its background, we were able to position our top-light panel really close to the car. In fact, it was in the camera frame. Being able to bring the top light source in so close made it possible to work with a smaller light panel than if we had positioned this light source out of the camera frame. Keep in mind that the size relationship between the light source and the subject is relative to how far away you place that light source from the surface of the subject. Imagine, if you will, someone lighting you with a large softbox, like a 4x6 footer at 12 feet away—at that distance the light source doesn’t look so big. Now imagine it placed three feet away from you: It looks really huge!
Here’s how the math works: if we wanted to have the effect of the light source the same, but needed it out of the camera frame, and let’s say that we had to double the distance of the top light panel from the car to do this, then we would need to make the light source panel four times larger than its current size. In other words, to keep the intensity of the specular highlight the same on the car’s surface and to have that specular highlight cover the same area of the car’s surface, our 9x20 foot panel would now have to become 18x40 feet—very, very big!
Meter readings, both incident and reflected, were made to measure the light striking the car and to measure the brightness of the specular highlights. These readings led us to adjust the shutter speed relative to the already established aperture, f/16. We set the camera to “Time,” shut off the room lights, opened the shutter, and unplugged the second light after 2 seconds, then unplugged the third light after 6 seconds, and then closed the shutter at 16 seconds. The tungsten color balance of the lights was adjusted during the processing of the raw file.
The first shot we took revealed wrinkles showing up in the specular highlight reflections on the wreck. They looked really bad. Stretching the muslin over the frame, no matter how hard you try, leaves a lot of wrinkles. These wrinkles in the muslin fabric will show up on the shiny surface of the car if the panel is in close enough to the subject (and it was!) to be included within the depth of field created by the working aperture. We made these wrinkles disappear by wiggling and jiggling the two panels during the long exposure. The final results shows nice clean-looking specular highlights from a relatively cheap light source; 10-foot wide muslin fabric makes an excellent diffusion material for large light sources. It is available from stage supply stores since it is used a lot to create backdrops for theater productions. Muslin is just about the cheapest fabric one can buy and is a light, off-white, creamy color. In its natural state it is not really suitable as a diffusion material for large light sources since it creates a very warm color cast. However, a little trip to the washing machine with a cup of bleach turns the muslin to a very neutral white, perfect for diffusing lights.
Using tungsten lights instead of strobes made long exposures necessary, which made the use of muslin possible since the long exposures gave lots of time to blur the wrinkles in the image with movement of the fabric. The formula is easy: a cup of bleach, a bit of muslin, and a little wiggly jiggly, and you too can make a beauty shot from a wreck. All you have to do is change gears from your regular way of shooting.